C++ 迭代器介绍
迭代器概念
Iterator(迭代器)是一种"能够迭代某序列内所有元素"的对象,可通过改变自寻常pointer的一致性接口来完成工作。Iterator奉行一个纯抽象概念:任何东西,只要行为类似iterator,就是一种iterator。然而不同的的iterator具有不同的行进能力。
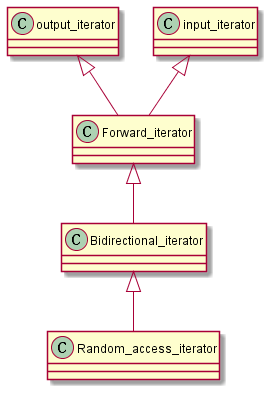
迭代器种类
| 迭代器种类 | 能力 | 提供者 |
|---|---|---|
| Output 迭代器 | 向前写入 | Ostream,inserter |
| Input 迭代器 | 向前读取一次 | Istream |
| Forward 迭代器 | 向前读取 | Forward list、unordered containers |
| Bidirectional 迭代器 | 向前和向后读取 | List、set、multiset、map、multimap |
| Random-access 迭代器 | 以随机访问方式读取 | Array、vector、deque、string、C-style array |
 |
Output迭代器
Output迭代器允许一步一步前行并搭配write动作。因此你可以一个一个元素地赋值,不能使用output迭代器对同一区间迭代两次。事实上,甚至不保证你可以将一个value复制两次而其迭代器不累进。我们的目标是将一个value以下列形式写入一个黑洞。
1 | while(...) { |
Output 迭代器无需比较操作。你无法检验output迭代器是否有效,或写入是否成功。你唯一可做的就是写入。通常,一批写入动作是以一个"额外条件定义出"的"特定output迭代器"作为结束。
见下表Output迭代器操作
| 表达式 | 效果 |
|---|---|
| *iter = val | 将val写至迭代器所指的位置 |
| ++iter | 向前步进(step forward), 返回新位置 |
| iter++ | 向前步进(step forward), 返回旧位置 |
| TYPE(iter) | 复制迭代器(copy 构造函数) |
通常,迭代器可用来读,也可用来写; 几乎所有reading迭代器都有write的额外功能,这种情况下他们被称为mutable(可产生变化的)迭代器。
一个典型的pure output迭代器例子是:“将元素写至标准输出设备”。 如果采用两个output迭代器写至屏幕, 第二个字将跟在第一个字后面,而不是覆盖第一个字。另一个典型的例子是inserter, 那是一种用来将他插入容器。如果随后写入第二个value, 并不会覆盖第一个value, 而是安插进去。
Input迭代器
Input迭代器只能一次一个以前行方向读取元素,按此顺序一个个返回元素值。
Input迭代器的各项操作
| 表达式 | 效果 |
|---|---|
| *iter | 读取实际元素 |
| iter->member | 读取实际元素的成员(如果有的话) |
| ++iter | 向前步进(step forward), 返回新位置 |
| iter++ | 向前步进(step forward), 返回旧位置 |
| iter1 == iter2 | 判断两个迭代器是否相等 |
| iter1 != iter2 | 判断两个迭代器是否不相等 |
| TYPE(iter) | 复制迭代器(copy 构造函数) |
Input迭代器只能读取元素一次。如果你复制input迭代器, 并令原input迭代器和新产生的拷贝都向前读取, 可能会遍历到不同的值。
所有的迭代器都具备input迭代器的能力,而且往往更强。Pure input迭代器的典型例子就是"从标准输入设备读取数据"。同一个值不会被读取两次。一旦从input stream读入一个字(离开input缓冲区), 下次读取时就会返回另一个字。
对于input迭代器, 操作符==和!=只用来检查"某个迭代器是否等于一个past-the-end迭代器(指指向最末元素的下一个位置)".这有其必要, 因为处理input迭代器的操作函数通常会有以下行为。
1 | InputIterator pos, end; |
没有任何保证说,两个迭代器如果都不是past-the-end迭代器, 且指向不同位置,他们的比较结果会不相等(这个条件是和forward迭代器搭配引入的)。
也请注意, input迭代器的后置式递增操作符(++iter)不一定会返回什么东西。不过通常它会返回旧位置。
你应该尽可能优先先选用前置式递增操作符(++iter)而非后置式递增操作符(iter++), 因为前者效能更好。因为后者会返回一个临时对象。
Forward(前向)迭代器
Forward迭代器是一种input迭代器且在前进读取时提供额外保证。
| 表达式 | 效果 |
|---|---|
| *iter | 访问实际元素 |
| iter->member | 访问实际元素的成员 |
| ++iter | 向前步进(返回新位置) |
| iter++ | 向前步进(返回旧位置) |
| iter1 == iter2 | 判断两个迭代器是否相等 |
| iter1 != iter2 | 判断两个迭代器是否不等 |
| TYPE() | 创建迭代器(default构造函数) |
| TYPE(iter) | 复制迭代器(拷贝构造函数) |
| iter1 = iter2 | 对迭代器赋值(assign) |
和input迭代器不同的是, 两个forward迭代器如果指向同一元素, operator==会获得true, 如果两者都递增, 会再次指向同一元素。 |
|
| 例如: |
1 | ForwardIterator pos1, pos2; |
Forward迭代器由以下对象和类型提供:
- Class<forward_list>
- Unordered container
然而标准库也允许unordered容器的实现提供bidirectional迭代器。
如果forward迭代器履行了output迭代器应有的条件, 那么它就是一个mutable forward迭代器, 即可用于读取,也可用于涂写。
Bidirectional(双向)迭代器
Bidirectional迭代器在forward迭代器的基础上增加回头迭代(iterate backward)能力。
Bidirectional 迭代器的新增操作
| 表达式 | 效果 |
|---|---|
| –iter | 步退(返回新位置) |
| iter– | 步退(返回旧位置) |
Bidirectional迭代器由以下的对象和类型提供:
- Class list<>.
- Associative(关联式) 关联式容器提供
如果bidirectional迭代器履行了output迭代器应有的条件, 那么他就是个mutable bidirectional迭代器, 即可用于读取, 也可用于涂写。
Random-Access(随机访问)迭代器
Random-access迭代器在bidirectional迭代器的基础上增加了随机访问能里。因此它必须提供iterator算数运算。也就是说,它能增减某个偏移量、
计算距离(difference), 并运用诸如<和>等管理操作符(relational operator)进行比较。
随机访问迭代器的新增操作:
| 表达式 | 效果 |
|---|---|
| iter[n] | 访问索引位置为n的元素 |
| iter+=n | 前进n个元素(如果n是负数, 则改为回退) |
| iter-=n | 回退n个元素(如果n是负数, 则改为前进) |
| iter+n | 返回iter之后的第n个元素 |
| n+iter | 返回iter之后的第n个元素 |
| iter-n | 返回iter之前的第n个元素 |
| iter1-iter2 | 返回iter1和iter2之间的距离 |
| iter1 < iter2 | 判断iter1是否在iter2之前 |
| iter1 > iter2 | 判断iter1是否在iter2之后 |
| iter1 <= iter2 | 判断iter1是否不在iter2之后 |
| iter1 >= iter2 | 判断iter1是否不在iter2之前 |
Random-access迭代器由以下对象和类型提供:
- 可随机访问的容器(
array、vector、deque) - String(
string、wstring) - 寻常的C-Style(
pointer)
迭代器相关辅助函数
std::advance()
std::advance()可将迭代器的位置增加, 增加的幅度由实参决定, 也就是说它令迭代器一次前进(或后退)多个元素:
1 |
|
- 令名称为pos的input迭代器前进(或后退)n个元素
- 对
bidirectinal迭代器和random-access迭代器而言, n可为负值, 表示后退 Dist是个template类型。通常它必须是个整数类型, 因为会调用诸如<、++、--等操作, 还要和0做比较。std::advance()并不检查迭代器是否超过序列的end()(因为迭代器通常不知道其所操作的容器, 因此并无检查)。所以, 调用std::advance()有可能导致不明确行为–因为"对序列尾端调用operator++"是一种未定义的行为。
对于random-access迭代器, 此函数只是简单地调用pos+=n, 因此具有常量复杂度。 对于其他任何类型的迭代器, 则调用++pos(或--pos如果n为负值)n次。因此,对于其他任何类型地迭代器, 本函数具有线性复杂度。
如果你希望你的程序可以轻松地更换容器和迭代器种类, 你应该使用std::advance()而不是operator+=
另外, 请注意std::advance()不具有返回值, 而operator+=会返回新位置, 所以后者可作为更大表达式的一部分。
下面是一个std::advance()的实现。
1 | /// 输入迭代器的情况 |
std::next()和std::prev()
c++ 提供了两个新增的辅助函数, 允许你前进和后退移动迭代器的位置。
1 |
|
- 导致
forward迭代器pos前进或n个位置 - 如果处理的是
bidirectional和random-access迭代器, n可为负值, 导致后退移动 Dist是类型std::iterator_traits<ForwardIterator>::difference_type- 其内部将对一个临时对象调用
std::advance(pos, n) - 注意,
std::next()并不检查是否会跨越序列的end()。因此调用者必须自行担保其结果有效。
1 |
|
- 导致
bidirectional迭代器pos后退一个或n个位置 - n可为负值, 导致向前移动
Dist是类型std::iterator_traits<ForwardIterator>::difference_type- 其内部将对一个临时对象调用
std::advance(pos, -n) - 注意,
std::prev()并不检查是否会跨越序列的begin()。因此调用者必须自行担保其结果有效。
下面写一个简单的实现:
1 | template <class _InIt> |
std::distance()
std::distance()用来处理两个迭代器之间的距离:
1 | Dist distance(InputIterator pos1, InputIterator pos2) |
- 返回两个
input迭代器pos1和pos2之间的距离。 - 两个迭代器必须指向同一个容器
- 如果不是
random-access迭代器, 则从pos1开始前进必须能够到达pos2, 亦即pos2的位置必须与pos1相同或在其后。 - 返回类型
Dist是类型std::iterator_traits<ForwardIterator>::difference_type
注意: 处理两个non-random-access迭代器之间的距离时, 必须十分小心。第一个迭代器所指的元素绝不能在第二个迭代器所指元素之后方, 否则会导致不明确的行为。如果不知道哪个迭代器在前, 你必须先算出两个迭代器分别至容器起点的距离, 在根据这两个距离来判断。
一个简单的实现:
1 | template <typename it> |
std::iter_swap()
这个简单的辅助函数用来交换两个迭代器所指的元素值
1 |
|
- 交换迭代器pos1和pos2所指的值
- 迭代器的类型不必相同, 但其所指的两个值必须可以相互赋值