三路比较符(C++20)
例子1:
1 |
|
例子2:
1 |
|
例子1:
1 |
|
例子2:
1 |
|
关联式容器(set、multiset、map和multimap)的排序准则的定义,和std::sort的排序准则定义必须遵守严格弱序,详细描述见官方解释(strict weak ordering.pdf)。
严格弱序的定义:
简单的来说就是a<b返回true,a=b和a>b返回false。
详细定义:
必须是非对称的(antisymmetric)。
对
operator<而言, 如果x < y为true, 则y < x为false。对判断式(predicate)
op()而言,如果op(x, y)为true,则op(y, x)为false。必须是可传递的(transitive)。
对
operator<而言,如果x < y 为true且y < z为true, 则x < z 为false。对判断式(predicate)
op()而言,如果op(x, y)为true且op(y, z)为tru,则op(x, z)为true。
必须是非自反的(irreflexive)
对
operator<而言,x < x 永远是false对判断式(predicate)
op()而言,op(x, x)永远是false。必须有等效传递性(transitivity of equivalence)
对
operator<而言,假如 !(a<b) && !(b<a) 为true且 !(b<c) && !(c<b) 为 true
那么!(a<c) && !(c<a) 也为true.
对判断式(predicate)op()而言, 假如 op(a,b), op(b,a), op(b,c), 和op(c,b) 都为
false, 那么op(a,c) and op(c,a) 也为false.
1 | // 一个定义std::set<struct>的例子 |
下面举一个会崩溃的例子对二维数组排序。
1 |
|
两个参数的重载符号简单示例
1 | class key |
1 | class key |
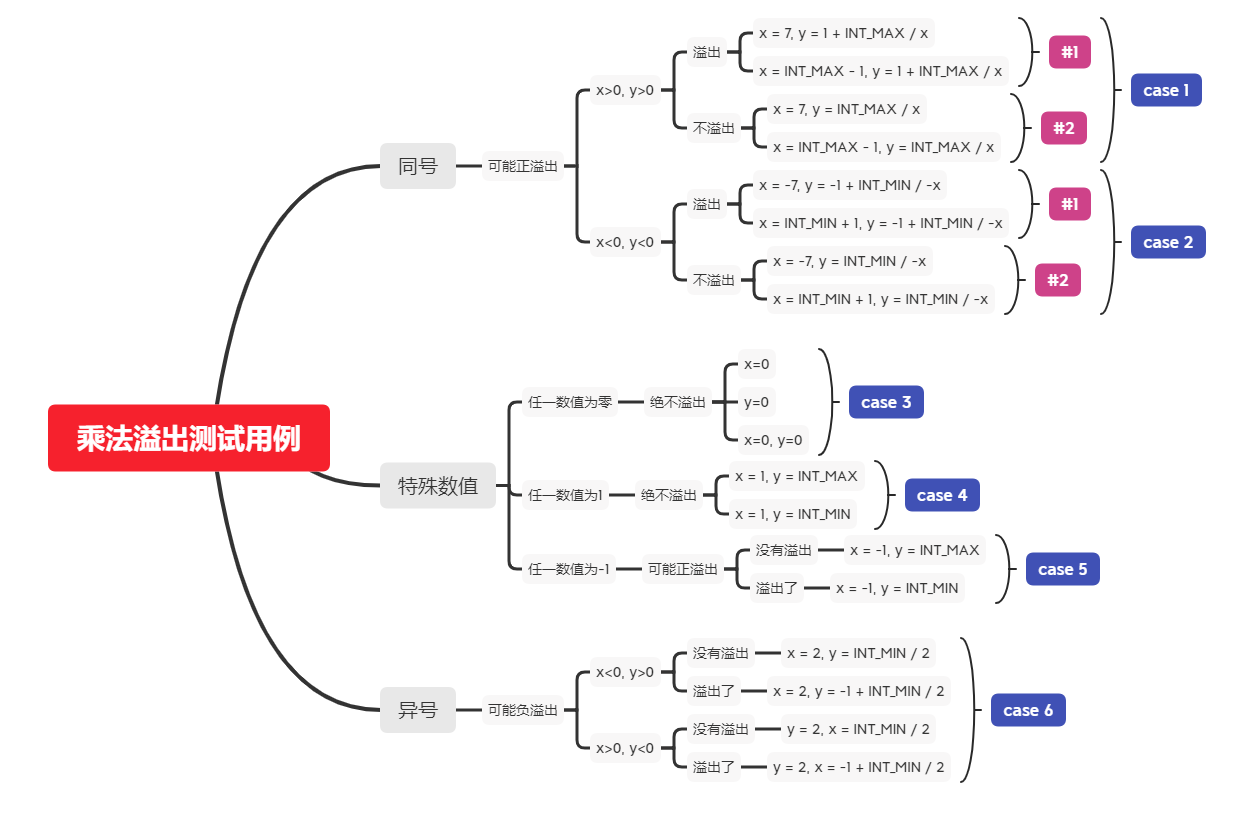
首先我们对于乘法溢出的判断,先写测试用例:
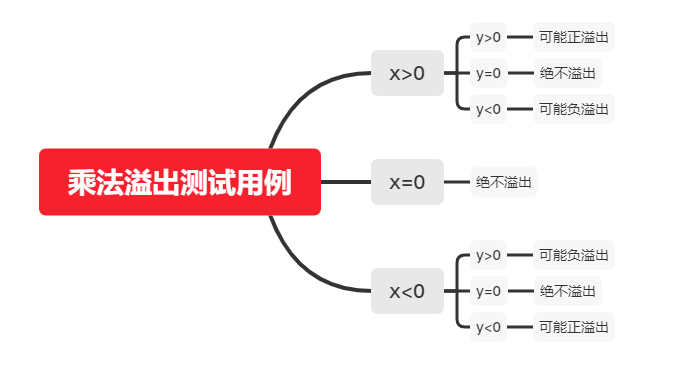
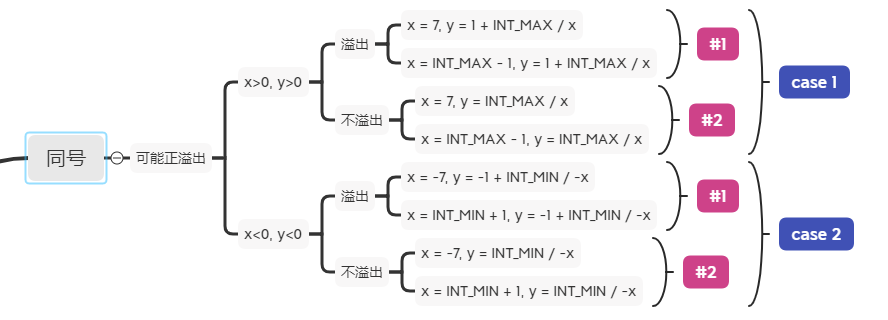
由上图我们简化测试用例:

我们可以这样设计乘法溢出函数:
1 | /// 判断两入参相乘是否溢出,溢出返回true,否则返回false |
接下来我们添加测试用例
1 |
|
接下来为特殊数值来添加判断:
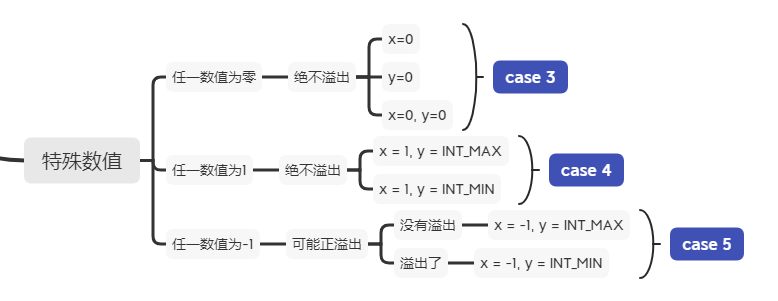
添加异号情况的判断:
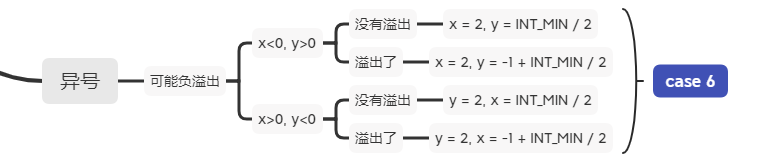
把函数改为模板,一并添加测试用例:
1 |
|
最后附上完整测试用例:
我们既然有了判断乘法溢出的函数,我们可以借此封装一个带有检查溢出的乘法函数。
1 |
|
引用标准中原文: 一条有用的方针,是任何基类的析构函数必须为公开且虚, 或受保护且非虚。
虚析构这个概念被设计出来就是为了解决基类指针指向派生类实例的析构问题,当一个基类指针指向派生类实例然后进行delete该指针时,只会执行基类析构函数而派生类的析构函数不会被执行,这将导致派生类构造的资源不会被正确释放,造成内存泄漏。如下示例:
1 |
|
运行结果:
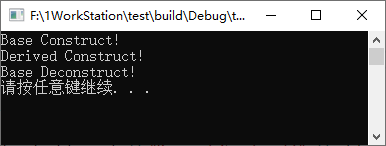
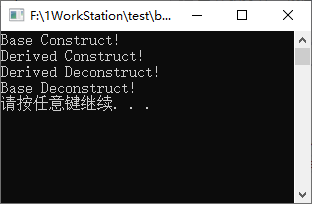
可以看到派生类没有被析构,如要解决该问题在基类析构函数处加上virtual关键字即可。
1 |
|
运行结果:
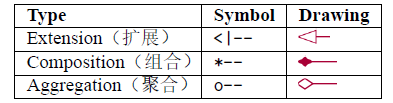
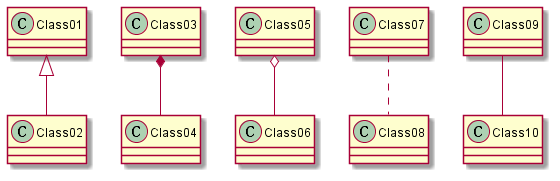
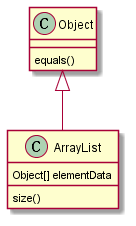
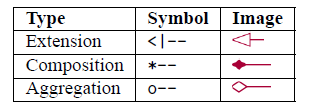
类之间的关系通过下面的符号定义:
1 | @startuml |
1 | @startuml |
1 | @startuml |
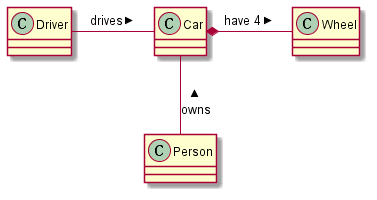
在关系之间使用标签来说明时, 使用: 后接标签文字。
对元素的说明,你可以在每一边使用"" 来说明.
1 | @startuml |

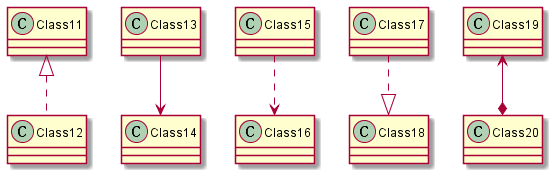
在标签的开始或结束位置添加< 或> 以表明是哪个对象作用到哪个对象上。
1 | @startuml |
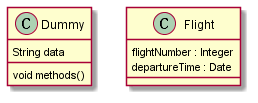
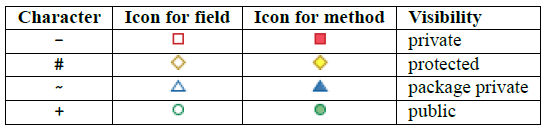
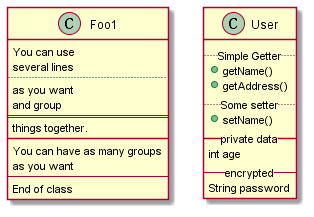
为了声明字段(对象属性)或者方法,你可以使用后接字段名或方法名。
系统检查是否有括号来判断是方法还是字段。
1 | @startuml |
也可以使用{} 把字段或者方法括起来
注意,这种语法对于类型/名字的顺序是非常灵活的。
1 | @startuml |
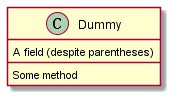
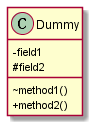
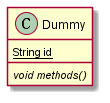
你可以(显式地)使用{field} 和{method} 修饰符来覆盖解析器的对于字段和方法的默认行为
1 | @startuml |
一旦你定义了域或者方法,你可以定义相应条目的可访问性质。
1 | @startuml |
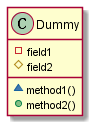
你可以采用命令(skinparam classAttributeIconSize 0 :)停用该特性
1 | @startuml |
通过修饰符{static} 或者{abstract},可以定义静态或者抽象的方法或者属性。
这些修饰符可以写在行的开始或者结束。也可以使用{classifier} 这个修饰符来代替{static}.
1 | @startuml |
PlantUML 默认自动将方法和属性重新分组,你可以自己定义分隔符来重排方法和属性,下面的分隔符都
是可用的:-- … == __.
还可以在分隔符中添加标题
1 | @startuml |
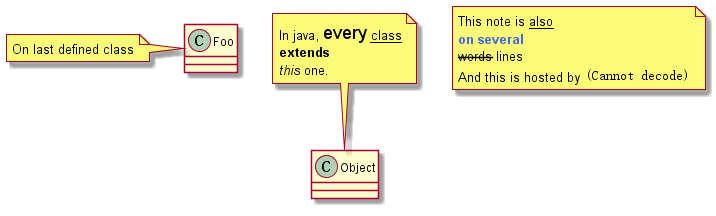
可以在注释中使用部分html 标签:
1 | @startuml |
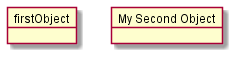
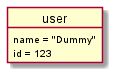
使用关键字object 定义实例。
1 | @startuml |
如下图生成:
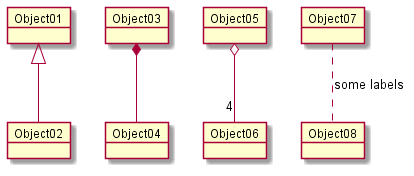
对象之间的关系可以用如下符号定义:
也可以用… 来代替-- 以使用点线。
知道了这些规则,就可以画下面的图:
可以用冒号给关系添加标签,标签内容紧跟在冒号之后。
用双引号在关系的两边添加基数。
1 | @startuml |
如下图生成:
用冒号加属性名的形式声明属性。
1 | @startuml |
如下图生成:
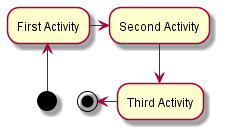
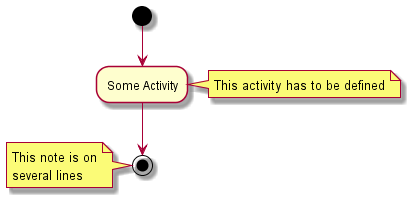
使用(*) 作为活动图的开始点和结束点。
有时,你可能想用(*top) 强制开始点位于图示的顶端。
使用–> 绘制箭头。
1 | @startuml |
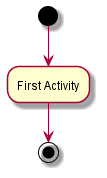
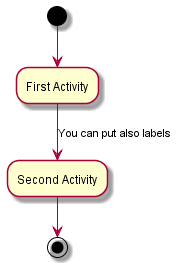
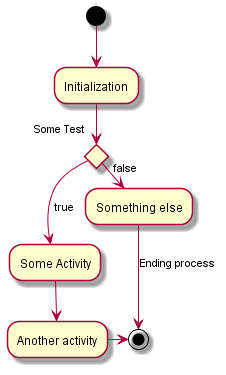
默认情况下,箭头开始于最接近的活动。
可以用[ 和 ] 放在箭头定义的后面来添加标签。
1 | @startuml |
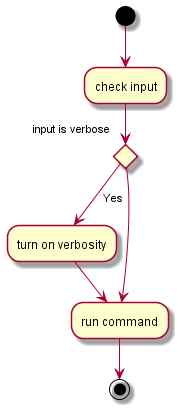
你可以使用-> 定义水平方向箭头,还可以使用下列语法强制指定箭头的方向:
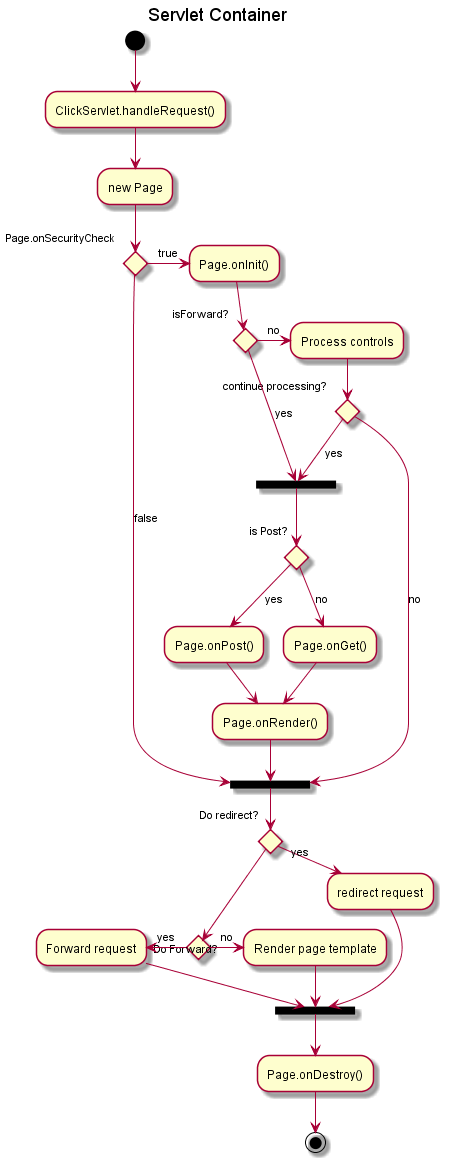
你可以使用关键字if/then/else 创建分支。
1 | @startuml |
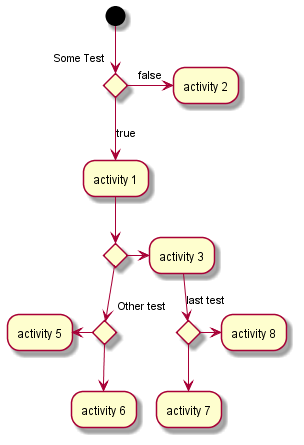
不过,有时你可能需要重复定义同一个活动:
1 | @startuml |
默认情况下,一个分支连接上一个最新的活动,但是也可以使用if 关键字进行连接。
还可以嵌套定义分支。
1 | @startuml |
你可以在活动定义之后用note left, note right, note top or note bottom, 命令给活动添加注释。
如果想给开始点添加注释,只需把注释的定义放在活动图最开始的地方即可。
也可以用关键字endnote 定义多行注释。
1 | @startuml |
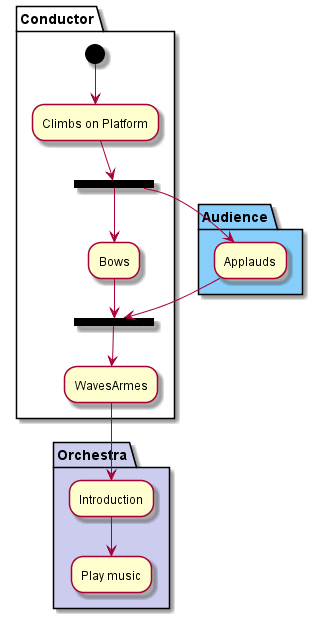
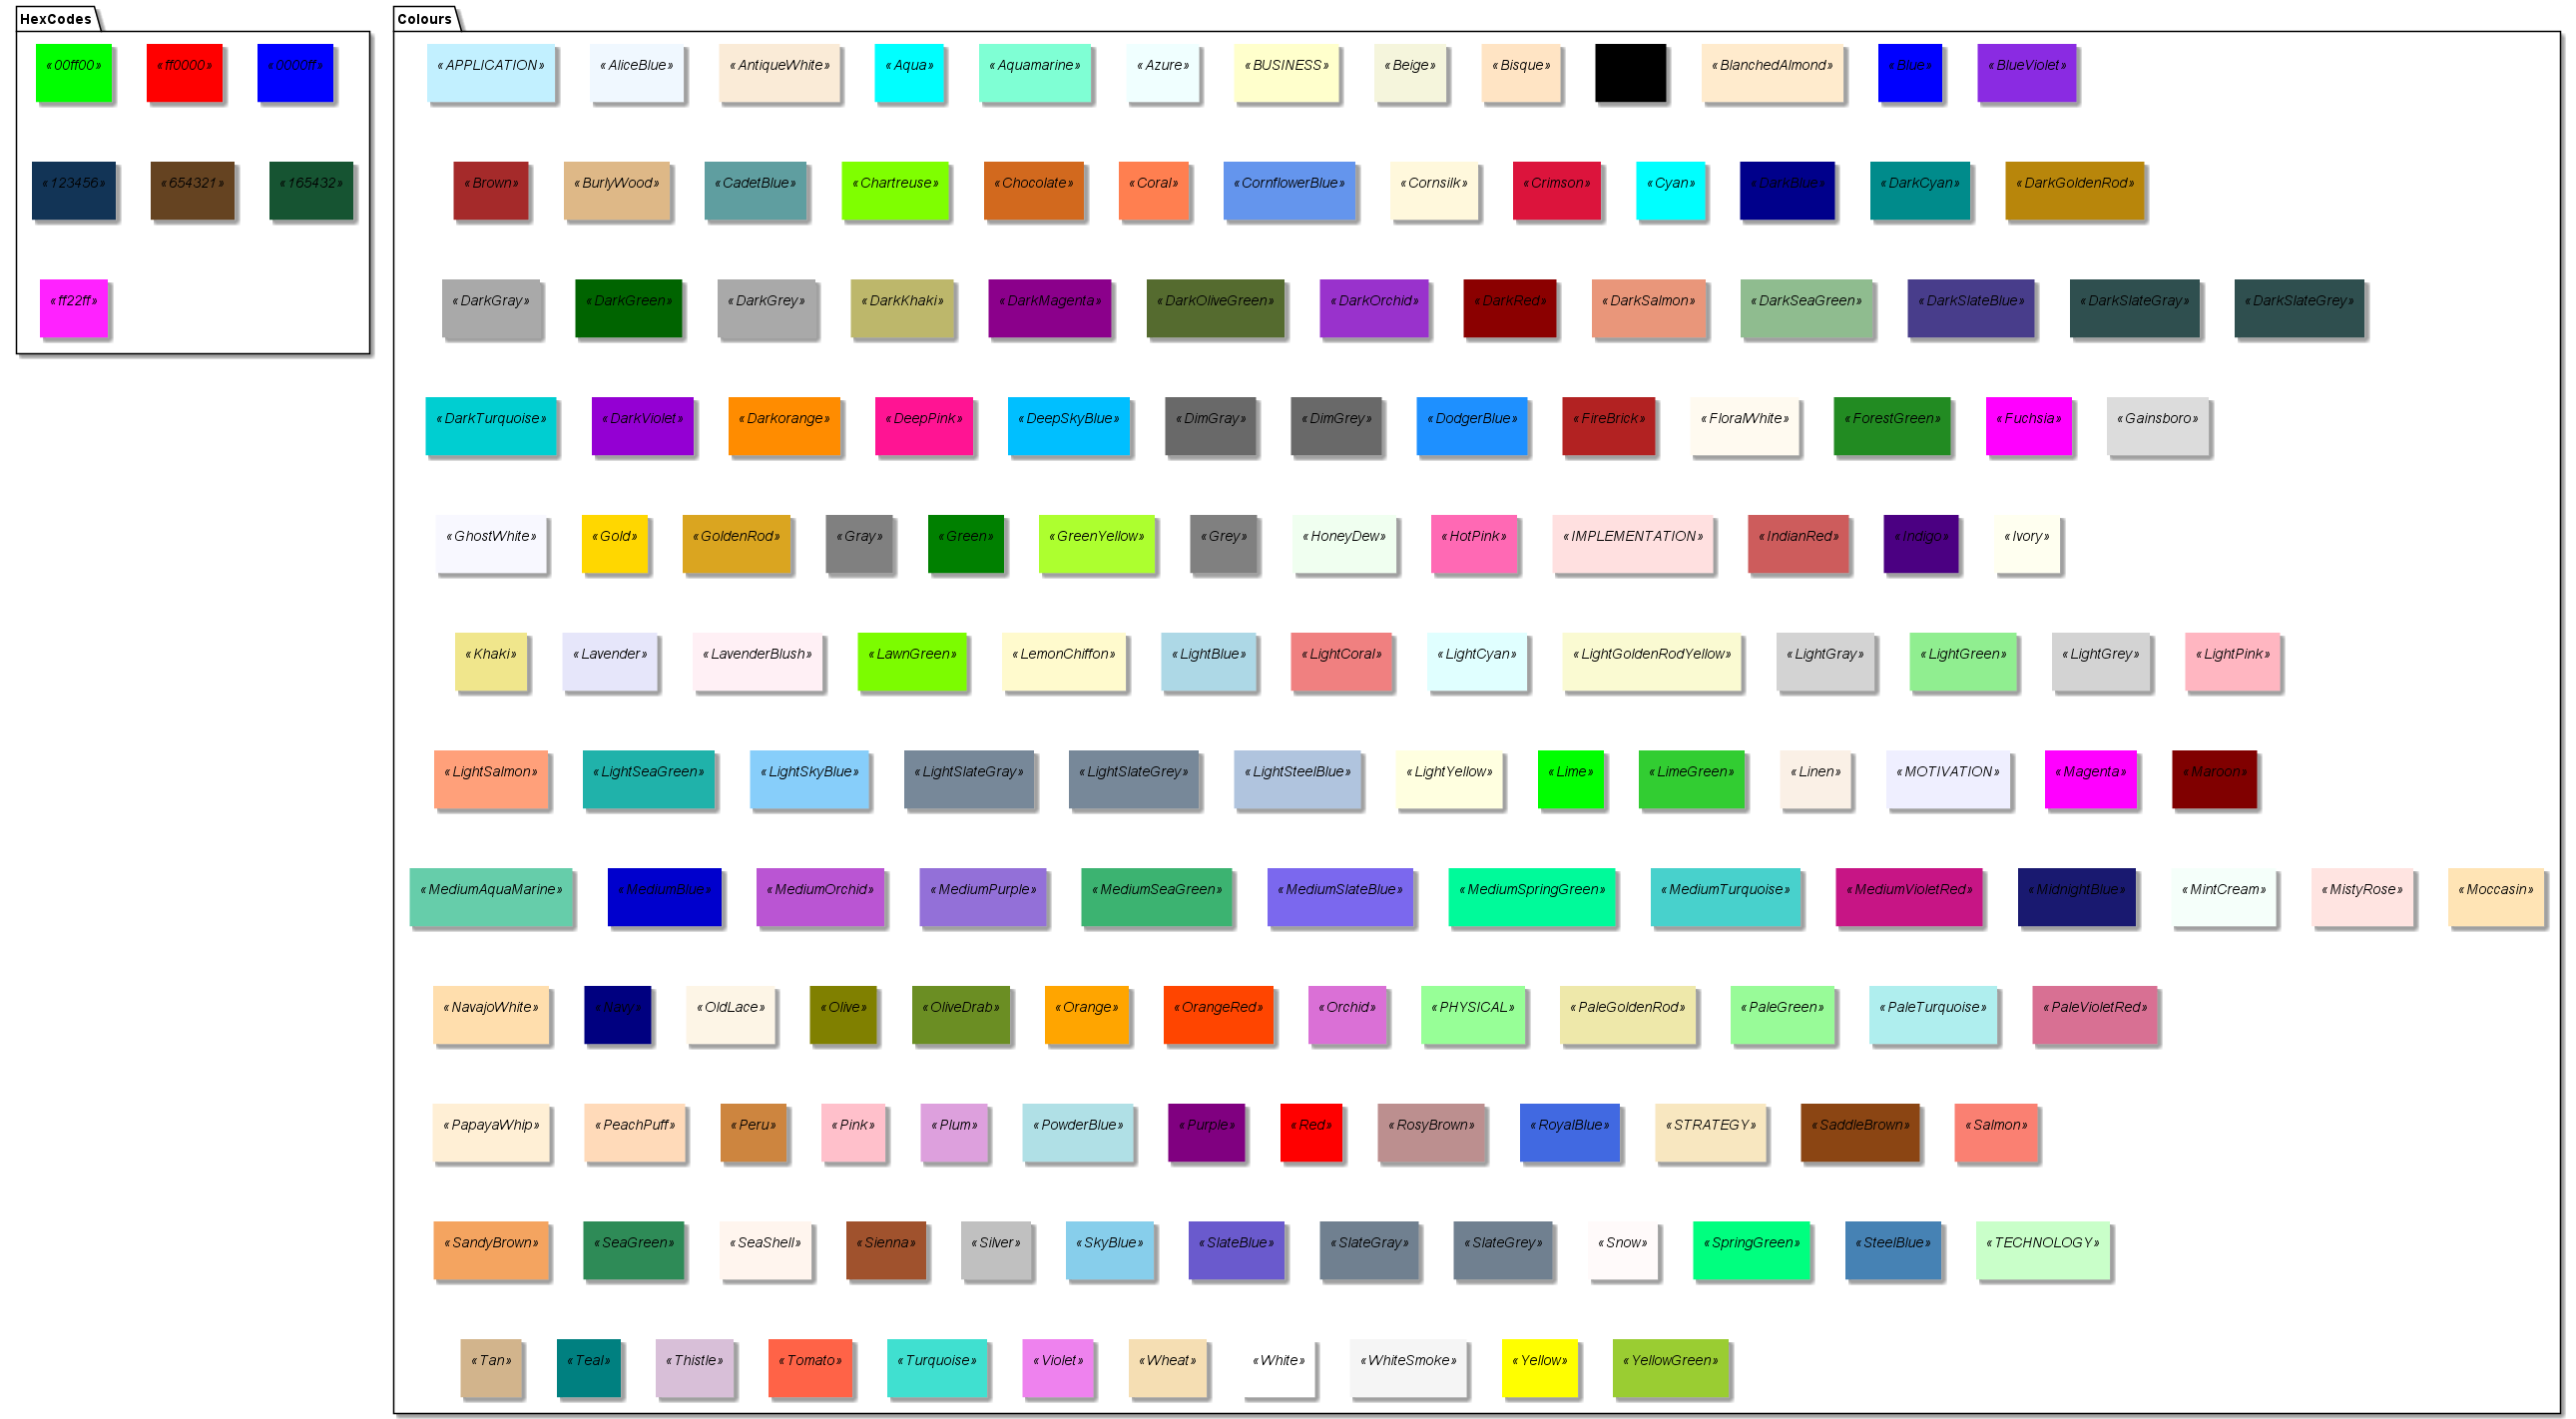
用关键字partition 定义分区,还可以设置背景色(用颜色名或者颜色值)。
定义活动的时候,它自动被放置到最新的分区中。
用} 结束分区的定义。
1 | @startuml |
1 | @startuml |
1 | @startuml |

1 | @startuml |
Github上这个库(progschj/thread_pool)的点赞最多,学习一下。
1 | class ThreadPool { |
1 | /// @name ThreadPool |
1 | inline ThreadPool::~ThreadPool() { |
1 | /// @name enqueue |
下面是一个很好的并行计算的例子。
1 |
|
std::async中的第一个参数是启动策略,它控制std::async的异步行为,我们可以用三种不同的启动策略来创建std::async
·std::launch::async
保证异步行为,即传递函数将在单独的线程中执行
·std::launch::deferred
当其他线程调用get()来访问共享状态时,将调用非异步行为
·std::launch::async | std::launch::deferred
默认行为。有了这个启动策略,它可以异步运行或不运行,这取决于系统的负载,但我们无法控制它。
见下面例子:
1 |
|
std::promise的作用就是提供一个不同线程之间的数据同步机制,它可以存储一个某种类型的值,并将其传递给对应的future, 即使这个future不在同一个线程中也可以安全的访问到这个值
1 |
|
1 |
|
由于硬件支持的并行线程数量有限,如果创建线程的数量比硬件支持的数量要多,那么CPU进行的上下文切换可能会浪费大量时间,所以了解硬件支持的线程数量是高效并行编程的重点。
使用std::thread::hardware_concurrency()来获取硬件支持的线程数量。
1 |
|
关于std::thread::yield 和 std::sleep_for的比较
例子:
1 | void worker_thread() { |
我们先概览一下spdlog-thread_pool定义
1 | class SPDLOG_API thread_pool |
首先我们从thread_pll中最基本的五个成员函数开始看。
1 | thread_pool(size_t q_max_items, size_t threads_n, |
可以看到该类删除了拷贝构造,移动构造,标志该类不可以被拷贝和移动。
其中有两个构造函数,我们来详细看看它们的实现。
1 | /// @name thread_pool |
接着我们来看一下析构函数执行了什么
1 | /// 告诉所有线程中止,并且执行join() |
接着我们来看公有的两个接口函数的实现
1 | /// 用于发送任务消息,并判断是否需要打印到命令行或写入文件 |
post_log 和 post_flush 执行了一个差不多的任务,就是写日志,这两个函数都调用了post_async_msg_()来执行具体的任务们就来看看post_async_msg_()到底执行了什么。
1 | /// @name post_async_msg_ |
如上面的实现,我们知道这是一个生产者,从外部插入到本对象内的任务队列,等待消费者来处理这些消息
我们来看看消费者到底执行了什么。
1 | /// @name worker_loop_ |
上面代码的逻辑我们可以看到:首先由worker_loop()函数来不停的执行消费者函数。
而消费者函数在不停地去任务队列中获取任务最后由backend_sink_it_() 和 backend_flush_()两个函数来执行真正地任务。
很简单的一个消费者和生产者的队列,但最核心的部分被一个任务队列mpmc_blocking_queue<async_msg>给封装了,让我们继续深入来看看这个任务队列。
1 | template <typename T> |
我们来看看这个队列是怎么实现线程安全的。
其中q_这个循环队列不是线程安全的,所以加上了一个queue_mutex 这个互斥锁用来同步所有成员函数的顺序并配合条件变量实现等待获取的功能。
spdlog-thread_pool 的实现逻辑很清晰,我们可以对比一下Github上另一个thread-pool: progschj/ThreadPool 的实现。
由于需要写入的任务很明确,就是处理异步日志,所以任务的队列直接写死了处理异步日志消息。而progschj/ThreadPool的实现则更加灵活。我们可以看看我的另一篇博客阅读progschj/thread_pool源码对progschj/ThreadPool的介绍
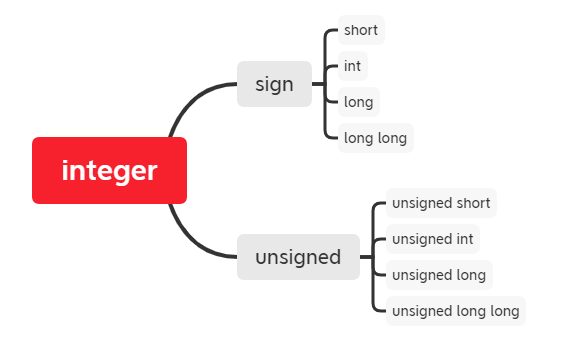
首先我们知道整型是由有符号和无符号整型所组成。由于有符号整型的判断包含了无符号整型的计算,所以我们现在先讨论有符号整型。
有符号整型的加法包括以下几种情况:
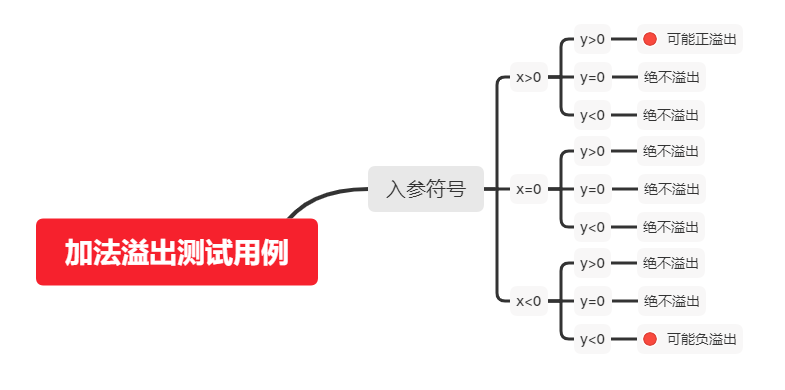
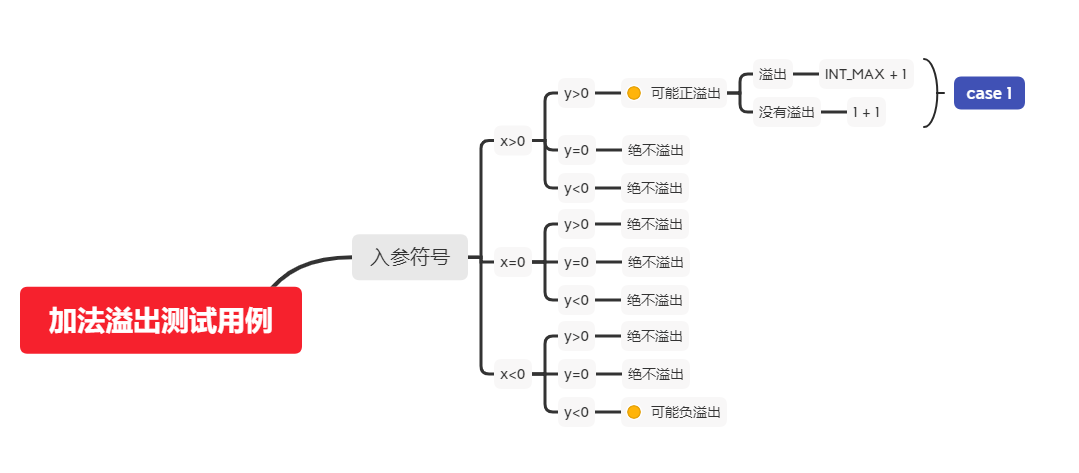
由上图我们可以知道我们只用考虑两个操作数拥有相同符号的情况就行了。我们显而易见的可以知道,两数相加的结果一定大于任一操作数,写出以下函数。
1 | /// 溢出了返回true,否则返回false |
接下来为了测试这个函数能否正确运行,我们添加如下测试用例:case 1.
完整验证程序:
1 |
|
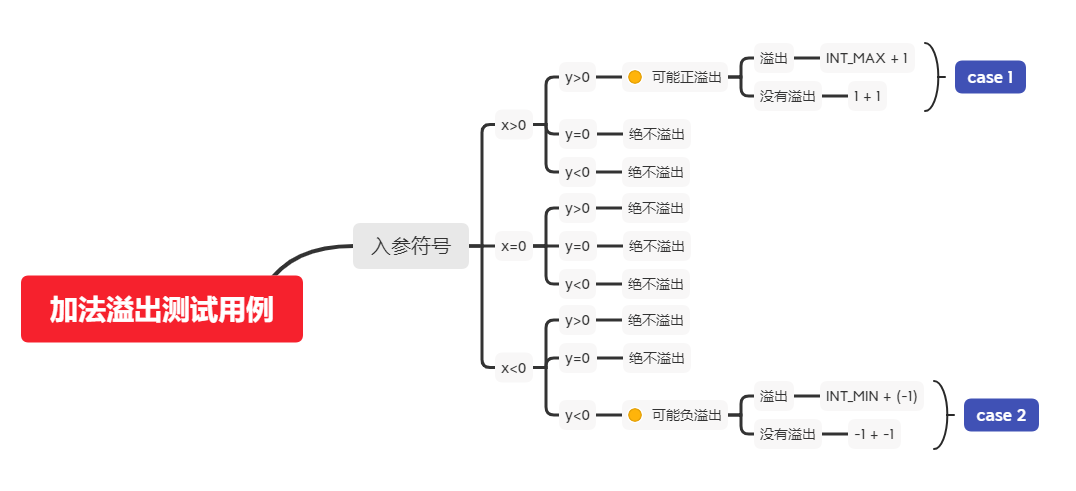
接下来考虑两数都为负数,判断负溢出的情况,同样我们知道两负数相加结果一定小于任一操作数, 对函数加以补充,并添加两个测试用例:case 2.
1 |
|
当上面的程序顺利执行完毕后我们可以继续往下看。接着我们能不能使用模板来扩展到其他类型的加法.
当然可以我们只需要把int换为模板参数T就行了。
1 | template<typename T> |
接下来我们为模板函数添加上类型限定和静态编译检查。然后同样使用测试用例:case 1 和 case 2 来测试以下这个模板函数。
1 |
|
接下来添加上详细的测试用例就大功告成了。

1 |
|
这个函数也可以用作检查减法是否溢出,只需要对第二个入参求相反数即可。但需要注意一个情况。
就是int值的负数个数(- 2^31)是比正数个数(2^31 - 1)多一个的, 所以在转化为相反数的时候可能在函数入参时出现溢出,导致计算没有溢出。
1 | int x = 2; |
1 |
|
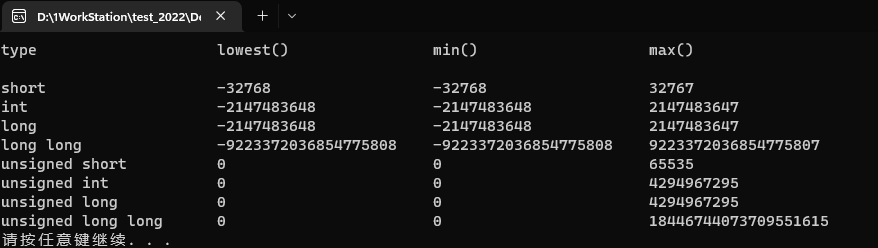
在64位系统上Visual Studio 输出结果:
换为2的幂级数表示为(64位系统下):
| type | lowest() | min() | max() |
|---|---|---|---|
| short | -32768 | -32768 | 32767 |
| int | -2147483648 | -2147483648 | 2147483647 |
| long | -2147483648 | -2147483648 | 2147483647 |
| long long | -9223372036854775808 | -9223372036854775808 | 9223372036854775807 |
| unsigned short | 0 | 0 | 65535 |
| unsigned int | 0 | 0 | 4294967295 |
| unsigned long | 0 | 0 | 4294967295 |
| unsigned long long | 0 | 0 | 18446744073709551615 |
在32位系统上Visual Studio 输出结果:
| type | lowest() | min() | max() |
|---|---|---|---|
| short | -32768 | -32768 | 32767 |
| int | -2147483648 | -2147483648 | 2147483647 |
| long | -2147483648 | -2147483648 | 2147483647 |
| long long | -9223372036854775808 | -9223372036854775808 | 9223372036854775807 |
| unsigned short | 0 | 0 | 65535 |
| unsigned int | 0 | 0 | 4294967295 |
| unsigned long | 0 | 0 | 4294967295 |
| unsigned long long | 0 | 0 | 18446744073709551615 |